

How to Draft-Proof a House Before Winter: The Micro Renovation That Pays You Back Every Month

Hold the back of your hand an inch from a closed exterior door on a windy November evening and you will usually feel the problem before you understand it: a thin, steady current of outside air moving across your skin, coming from a house that is supposedly sealed shut. That draft is not a quirk of an old building. It’s a specific, findable, fixable gap in the envelope. Learning how to draft-proof a house before winter sets in is one of the few home projects that starts paying you back on the very first cold snap.
Draft-proofing gets filed under “someday” in most households, because it sounds small, and smallness reads as unimportant. It isn’t. A typical detached home loses a meaningful share of its heating energy not through the walls or windows themselves, but through the air that leaks around them. Most homeowners have never consciously registered these gaps, because nobody’s shown them where to look. This is the rare renovation that costs less than a nice dinner out, takes a single weekend, and shows up as a smaller number on next month’s gas or electricity bill.
Start with the five-minute walkthrough. Guessing where a house leaks wastes both time and materials. Pick a day when the wind is actually blowing, and turn off the furnace fan so you’re not chasing mechanical air movement. Then run the back of your hand — more sensitive to moving air than your palm — slowly around every exterior door, every window frame, every baseboard on an outside wall, the attic hatch, and any spot where a pipe or wire passes through an exterior wall. A lit stick of incense makes the same leaks visible as a thin, wavering line of smoke, which is useful if you want to show someone else exactly what you found. Keep a notepad. You’re building a punch list, not fixing anything yet.
The order matters more than the individual fixes, and this is the part most weekend projects get backwards: air-seal before you insulate, every time. Insulation slows down conductive heat loss — heat moving through a solid material. It does nothing, though, to stop convective loss, which is air itself moving through a gap. Pile fresh attic insulation on top of an unsealed gap around a bathroom fan housing or a wiring penetration, and you haven’t solved anything. You’ve just buried the leak under material that can also trap warm, moisture-laden indoor air against a cold surface — exactly how attics and wall cavities end up with hidden condensation, and eventually mould. Seal first. Insulate second. It’s the one sequencing rule in this whole project that isn’t negotiable.
Doors are usually the most obvious leak and the cheapest to fix. Turn on the interior lights at dusk, then kneel down and look for daylight under the door from outside. A bright line at the bottom means air is moving through that gap in both directions, all day long. A new door sweep closes it in about ten minutes with a screwdriver, and costs $15 to $25. Check the threshold next. Many adjustable thresholds have a screw that raises or lowers the seal. A quarter-turn is often the difference between a door that closes with resistance and one that closes with a draft. Around the jamb itself, compressible foam or V-strip weatherstripping seals the sides and top. Measure each door separately rather than guessing — exterior doors and interior doors leading to garages or unheated additions both count.
Windows need a gentler touch, because the wrong fix here creates a new problem. Caulk the fixed joint where the window frame meets the wall — that seam never needs to move, so a paintable, exterior-grade acrylic-latex or silicone caulk is the right call. Never caulk an operable sash shut. Weatherstripping, not caulk, belongs on any part of the window that’s meant to open, or you’ll fight it — or worse, break the seal by force — the first warm week of spring. Older single-pane windows benefit most from an interior shrink film kit: a few dollars a window, shrunk taut with a hair dryer, and effective at cutting convective loss over a winter. One exception matters here. Never apply shrink film to a window that serves as a required fire-code egress from a bedroom. It has to open quickly in an emergency, and film defeats that.
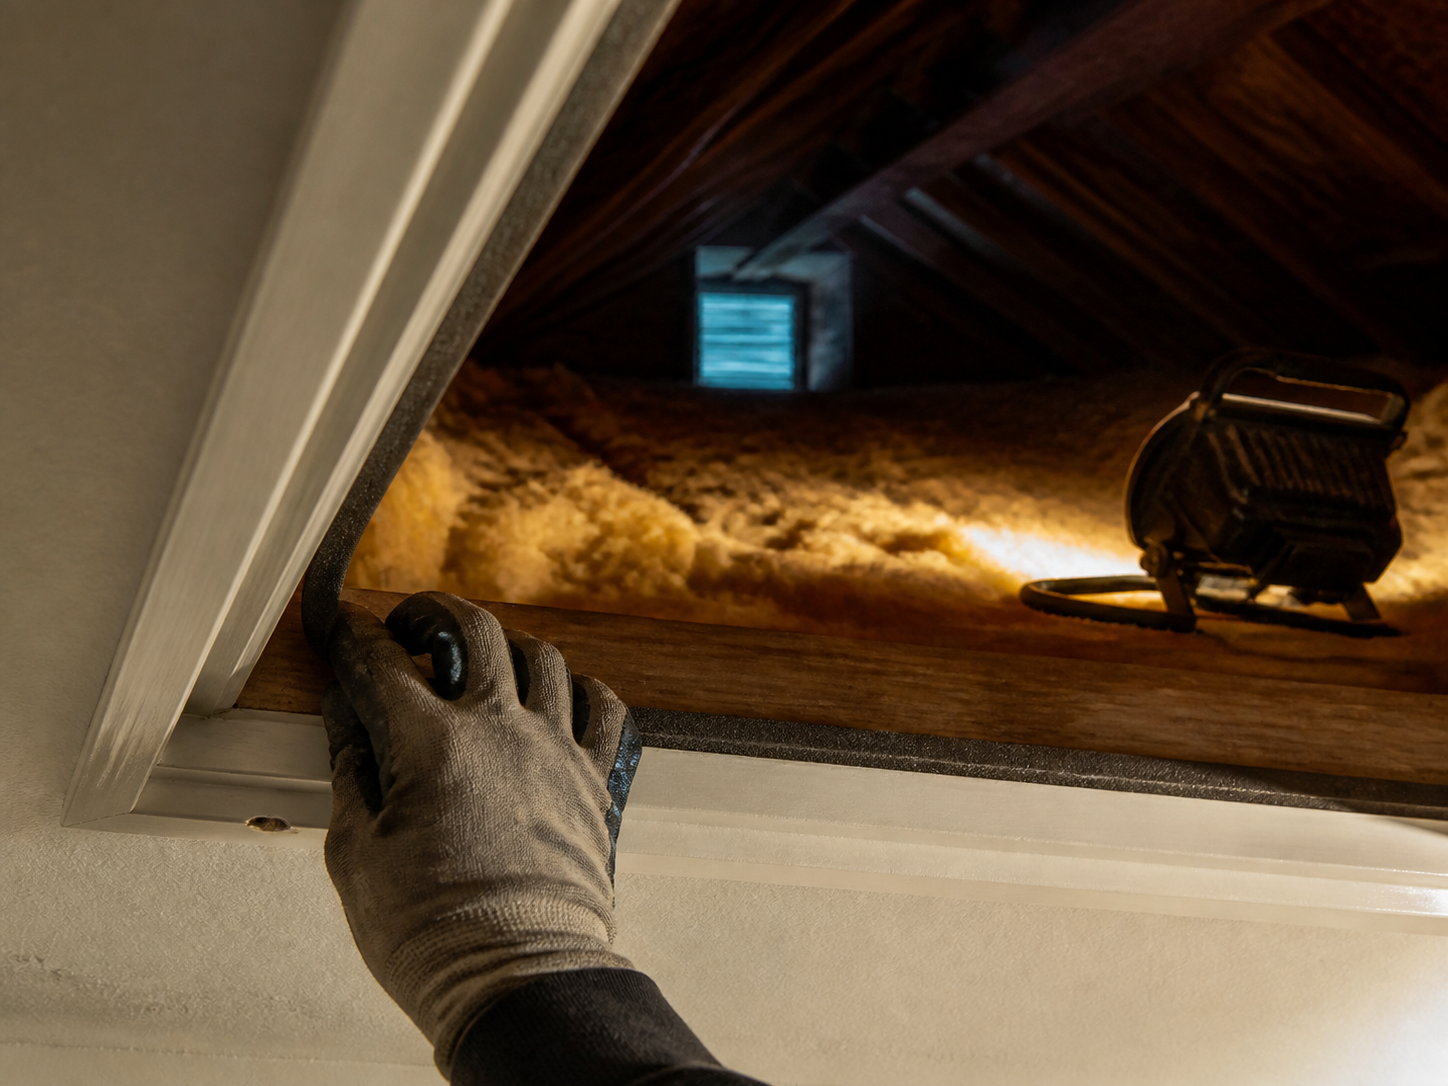
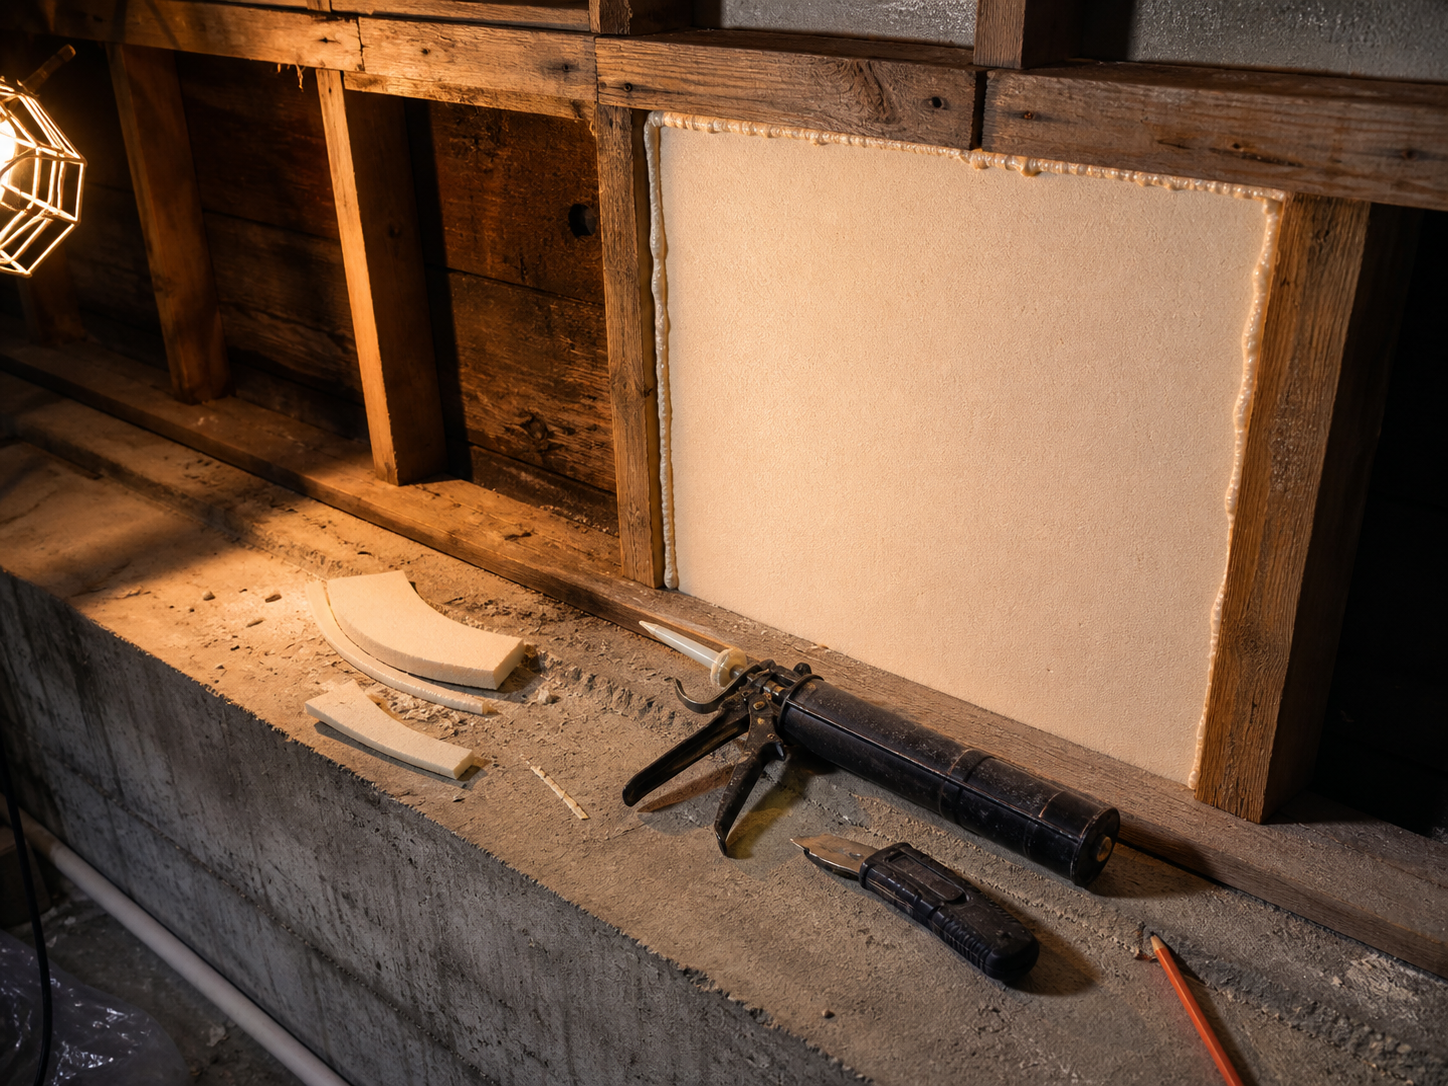
The leaks that actually move the needle on a heating bill, though, are usually the ones nobody thinks to check. Electrical outlets and switches on exterior walls each have a small gap around the box itself. A foam gasket behind the cover plate, sold in packs of a dozen for under $10, closes dozens of these in under an hour. The attic hatch or pull-down stair is routinely one of the single largest unsealed openings in an entire house, often with no weatherstripping at all and next to no insulation value on the hatch itself. A simple insulated cover box and a strip of weatherstripping around the frame can address a leak that’s frequently bigger than every window in the house combined. The rim joist is another chronic offender — the band of framing that sits on top of the foundation wall in an unfinished basement, visible as a horizontal strip above the concrete. Most homeowners have never once looked at it. Rigid foam board, cut to fit between the floor joists and sealed at the edges with spray foam or caulk, closes it permanently. Last, check the dryer vent’s backdraft damper — the flap that’s supposed to close when the dryer isn’t running. A bent or stuck damper is a wide-open hole to the outside, every hour of the day.
If you want to know exactly how tight your house is before and after this work, a blower door test is the tool for it. An energy advisor mounts a calibrated fan in an exterior doorway and depressurizes the house to 50 pascals — roughly the pressure of a steady 30 km/h wind hitting every surface at once. The fan’s airflow, measured to hold that pressure, converts into an air changes per hour figure. A standalone test typically runs $200 to $450. A full home energy audit that includes it usually lands between $300 and $600 across most of Canada. It’s genuinely useful before a bigger air-sealing or insulation project, when you want a before-and-after number to prove the work did something. It’s also worth it if you’re pursuing a rebate program that requires a pre- and post-retrofit assessment. For a weekend DIY pass with a caulk gun and a box of weatherstripping, though, the five-minute walkthrough will usually tell you everything you need to know without the added cost.
Rebate information below was current as of August 24, 2026. Canadian home-energy incentive programs have changed repeatedly over the past two years — confirm current terms directly with the program administrator before booking work or ordering materials.
The federal picture has thinned out considerably. The Canada Greener Homes Grant closed to new applications back in February 2024. The companion Canada Greener Homes Loan stopped accepting new applications on October 1, 2025. Both are now winding down existing files rather than opening new ones. The Oil to Heat Pump Affordability program, which helped oil-heated households switch to electric heat pumps, also stopped taking new applications as of July 31, 2026. Homeowners already approved have until January 31, 2027 to submit their paperwork. The federal government has signalled interest in reviving a homeowner grant, but there’s no confirmed launch date or funding envelope attached to that promise as of this writing. It isn’t something to plan a renovation timeline around.
Ontario homeowners still have a genuinely useful active option, though. The Home Renovation Savings program is delivered by Enbridge Gas and Save on Energy, with support from the provincial government. It replaced the older Home Efficiency Rebate Plus program and is open to both natural-gas and electrically heated homes. It also covers exactly the kind of work this article is about. Air sealing and insulation sit inside the program’s assessment-based stream, which can be worth several thousand dollars combined for a home that bundles two or more qualifying upgrades. There’s also a standalone attic insulation path that skips the full home energy assessment entirely. Program terms, dollar caps, and eligibility details shift periodically, so verify the current numbers on the official site before you commit to a contractor quote based on last year’s figures.
Here’s what a realistic weekend of draft-proofing actually looks like on paper. Take a typical 1970s detached bungalow in southern Ontario: roughly 1,400 square feet, natural gas heat, an annual heating bill somewhere between $1,400 and $1,800 depending on the winter. Building-science estimates consistently put air sealing’s share of a home’s total heating loss reduction in the 10 to 20 percent range, when it’s done properly and in the right order relative to insulation. Even on the conservative end of that range, this is a genuine, ongoing reduction in a monthly bill. It isn’t a one-time rebate check. It’s a permanent shift in how hard the furnace has to work, every single month of the heating season.
What most people miss is that over-sealing is a real risk, not a theoretical one. It shows up in exactly the homes most tempted to chase every last draft. Older furnaces and water heaters that rely on natural draft — no power vent, no sealed combustion chamber — pull a certain amount of house air to feed combustion and carry exhaust up the flue. Seal a house too tightly around that appliance’s combustion air supply, without makeup air, a sealed-combustion upgrade, or mechanical ventilation like a heat recovery ventilator, and you risk backdrafting. That means exhaust gases, including carbon monoxide, get pulled back into the living space instead of going up the chimney. Never close off a dedicated combustion-air inlet to stop a draft. If your house has an older atmospheric-draft furnace or water heater, that’s a conversation for a heating contractor before, not after, a big sealing push. A working carbon monoxide detector on every level of the house is non-negotiable regardless.
Run the five-minute draft check on every exterior door, window, and outlet, and write down every leak you find before buying anything.
Install door sweeps, adjust thresholds, add jamb weatherstripping, caulk fixed window frames, and weatherstrip operable sashes.
Gasket every outlet on an exterior wall, seal and insulate the attic hatch, and check the dryer vent damper.
Cut and fit rigid foam between basement rim joist bays and seal the edges — the single most overlooked leak in most detached homes.
- Door sweep(s) and threshold adjustment.
- Compressible foam or V-strip weatherstripping, by the door or window.
- Paintable exterior acrylic-latex or silicone caulk, plus a caulk gun.
- Interior window shrink film kit. Skip this on bedroom egress windows.
- Foam outlet and switch gaskets, a pack of 12 or more.
- Attic hatch insulated cover box, store-bought or a DIY foam-board box.
- Rigid foam board, cut to rim joist bay size, plus canned spray foam or sealant.
- A working carbon monoxide detector for every level of the house.
Ordering the door sweep, the caulk, the outlet gaskets, and the rim joist foam separately? Prime’s free two-day shipping means the whole materials list shows up together, not spread across three deliveries over a week you’d rather spend actually sealing the house.
Try Amazon Prime →This is a referral link — if you sign up, NestDigest may earn a small commission at no extra cost to you.
None of this requires a contractor, a permit, or a single trip to a specialty supplier. Everything on that list is sitting on a shelf at any hardware store in the country. What it requires is the fifteen minutes it takes to actually find the leaks, before you start buying fixes for problems you haven’t confirmed exist. A house that’s properly draft-proofed before the first hard freeze doesn’t announce itself with anything dramatic. It just runs quieter, feels more even room to room, and shows up as a smaller number on the bill every month for the rest of the winter. For a weekend’s work, that’s about as good a return as home renovation gets.
Before you start, it’s worth reading up on making a home more energy efficient. The same envelope logic that keeps winter drafts out also keeps summer cooling costs down. If you’re building this into a broader fall routine, our preventative home maintenance checklist covers the other systems worth checking before the cold sets in. If humidity issues show up once the house is sealed tighter, our guide to maintaining humidity levels is the natural next read. And if you’re on the fence about whether a weekend of caulk and weatherstripping is worth it at all, our breakdown of the cost of delaying home repairs makes the case in dollar terms.
How do I know if my house needs draft-proofing?
If a room feels colder near the exterior walls than the thermostat reading suggests, if you can see daylight around a door frame, or if your heating bill runs noticeably higher than a similarly sized neighbouring home, air leakage is a likely cause. The five-minute walkthrough above will usually confirm it in one windy evening.
Should I air-seal or insulate first?
Air-seal first, always. Insulation slows conductive heat loss but does nothing to stop air moving through gaps, and insulating over an unsealed leak risks trapping warm, moist indoor air against a cold surface — a common cause of hidden condensation and mould.
Is a blower door test worth it for a typical home?
It’s worth it before a larger insulation or window project, or before applying to a rebate program that requires a pre- and post-retrofit assessment. For a simple DIY weekend pass, the five-minute walkthrough usually tells you enough on its own.
Can you over-seal a house?
Yes. Homes with older, naturally aspirating furnaces or water heaters rely on house air for combustion and draft. Sealing too aggressively without makeup air, a sealed-combustion upgrade, or mechanical ventilation can cause backdrafting. Never block a dedicated combustion-air inlet to stop a draft.
Are there rebates for draft-proofing a home in Canada right now?
As of August 2026, the federal Greener Homes Grant, Greener Homes Loan, and Oil to Heat Pump Affordability program are all closed to new applicants. In Ontario, the Home Renovation Savings program remains active and covers insulation and air sealing for both gas- and electrically heated homes — confirm current terms before starting work.
A house doesn’t keep you warm by holding heat in. It keeps you warm by refusing to let the cold in uninvited.
— NestDigest