Most beginner gardeners wait until spring to think about their summer garden. But experienced growers know the truth: preparing your garden in winter for summer is the secret to healthier plants, bigger harvests, and far less stress during peak growing season.
Winter garden planning isn’t just about ordering seed catalogs from your couch. It’s about understanding plant life cycles, improving soil while it rests, starting seeds indoors at the right time, and setting up systems that will support your garden for months to come.
Whether you’re gardening in Canada, the Northern United States, or any cold climate with a short growing season, this comprehensive guide will show you exactly what to do during winter to ensure your summer garden thrives.
Why Winter Garden Planning Is Critical for Summer Success
Winter preparation directly determines summer garden performance. Here’s what happens when you plan ahead during the cold months.
Strong Root Development Starts Early
Many vegetables and flowers need 8-12 weeks of growth before they can produce blooms or fruit. When you start seeds indoors during winter, you’re giving plants a critical head start.
A tomato seedling started indoors in late winter develops a robust root system in controlled conditions. By the time your last frost date arrives, that plant is ready to transplant and will produce ripe tomatoes weeks earlier than seeds sown directly outdoors in spring.
Soil Preparation Can’t Be Rushed
Healthy soil takes time to develop. Organic amendments like compost need weeks to decompose and integrate with existing soil structure.
Adding compost or aged manure in winter allows these materials to break down slowly through freeze-thaw cycles. By spring, your soil is nutrient-rich, well-structured, and biologically active—ready to support vigorous plant growth immediately.
Trying to improve soil right before planting often backfires. Fresh amendments haven’t decomposed yet, which can actually stress young plants or tie up nitrogen they need.
Winter Soil Preparation Prevents Pest Problems
Garden pests overwinter in plant debris, dead stems, and soil crevices. Winter is your window to break pest cycles before they start.
Cleaning garden beds during winter, removing dead plant material, and covering soil with fresh mulch eliminates pest habitat. This proactive approach is far more effective than fighting infestations later.
Avoiding the Spring Rush Reduces Mistakes
Every gardener knows the chaos of April and May: garden centers mobbed with shoppers, seed packets sold out, and a frantic rush to prepare beds, buy supplies, and start seeds all at once.
Winter garden planning eliminates this stress. You research varieties thoroughly, order seeds early for better selection, organize tools, and work at your own pace. When spring arrives, you simply execute your plan instead of improvising under pressure.
Understanding Your Growing Season and Frost Dates
Before planting anything, you must understand your specific growing season—the frost-free period when tender plants can safely grow outdoors.
What Are Frost Dates and Why Do They Matter?
Your last spring frost date is the average date of the final killing frost in your area. Your first fall frost date is when cold weather typically returns.
The period between these dates is your growing season. In cold climates like Ontario, this might be 120-140 frost-free days. Warmer regions may have 180-240 days.
This matters because plants have specific temperature requirements and time-to-harvest needs. A tomato variety requiring 80 days from transplant to harvest won’t succeed in a 100-day growing season if you plant seeds outdoors in spring—there simply isn’t enough time before fall frost.
How to Find Your Frost Dates
Search online for “last frost date” plus your city, postal code, or ZIP code. The USDA Plant Hardiness Zone Map and Canadian equivalents provide general guidance, but local agricultural extensions offer more precise data.
For Canadian gardeners, frost dates vary dramatically. Southern Ontario typically sees last frost in early-to-mid May, while Northern Ontario may not be frost-free until early June.
Cool-Season vs Warm-Season Plants: Critical Timing Differences
Understanding this distinction is essential for proper seed starting schedules and planting timing.
Cool-season plants tolerate light frost and prefer cooler temperatures (50-70°F). These include:
- Lettuce, spinach, kale, and other leafy greens
- Peas, radishes, and carrots
- Pansies, snapdragons, and sweet peas
- Broccoli, cauliflower, and cabbage
Cool-season crops can be planted 2-4 weeks before your last frost date, and some can even be direct-sown as soon as soil can be worked.
Warm-season plants die if exposed to frost and need soil temperatures above 60°F. These include:
- Tomatoes, peppers, and eggplants
- Beans, squash, and cucumbers
- Basil and most herbs
- Zinnias, marigolds, and sunflowers
Warm-season plants cannot go outdoors until after your last frost date, and soil must be warm enough to support root growth.
Planning these timing differences during winter ensures every plant goes outdoors at the optimal moment.

Quick Winter Garden Checklist for Summer Success
Use this actionable checklist to guide your winter garden planning:
Soil Preparation Tasks:
- Test soil pH and structure with a simple DIY assessment
- Add 2-4 inches of compost or aged manure to garden beds
- Spread mulch over bare soil to prevent erosion
- Prepare or purchase potting mix for container gardens
Research and Planning:
- Determine your last frost date and first frost date
- Calculate seed starting dates working backward from last frost
- Choose vegetable and flower varieties suited to your climate
- Sketch garden layout noting sun exposure and spacing needs
Seed Starting Setup:
- Order seeds early for best selection
- Gather seed trays, seed starting mix, and plant labels
- Set up grow lights or identify sunny south-facing windows
- Create a seed starting calendar based on frost dates
Tools and Supplies:
- Clean and sharpen existing garden tools
- Purchase or organize basic tools (trowel, pruners, gloves, watering can)
- Stock up on containers, stakes, and support materials
- Set up composting system if starting from scratch
Winter Soil Preparation for Summer Garden Health
Soil quality is the single most important factor determining garden success. Winter is the ideal time for soil improvement because you can work without disturbing growing plants.
Simple Soil Assessment Methods for Beginners
You don’t need expensive laboratory testing to evaluate your soil.
The squeeze test: Grab a handful of moist (not wet) soil and squeeze it firmly. Open your hand.
- If it stays in a dense, solid ball that doesn’t crumble when poked, you have heavy clay soil
- If it falls apart immediately without holding shape, you have sandy soil
- If it holds together but crumbles easily when pressed, you have ideal loam
The drainage test: Dig a hole 12 inches deep and fill it with water. Let it drain completely, then fill it again. Time how long the second fill takes to drain.
- Draining in less than 4 hours indicates sandy soil (drains too fast)
- Draining in 4-8 hours indicates good drainage
- Taking more than 8 hours indicates poor drainage (common with clay)
Adding Organic Matter: The Universal Soil Improver
Compost is the most valuable amendment for any soil type. It improves drainage in clay soils while helping sandy soils retain moisture and nutrients.
Best practice for winter soil preparation: Spread 2-4 inches of finished compost or well-aged manure over garden beds. If the ground isn’t frozen, work it lightly into the top 4-6 inches of soil using a garden fork.
If ground is frozen, simply spread compost on the surface. It will begin decomposing through freeze-thaw cycles and can be incorporated in early spring.
Other beneficial amendments:
- Shredded leaves (excellent free mulch that breaks down into humus)
- Aged wood chips or bark mulch (improves structure long-term)
- Peat moss or coconut coir (acidifies soil and improves moisture retention)
Protecting Soil Through Winter
Bare soil erodes easily from winter rain and snow melt. Covering soil with organic mulch protects structure and prevents weed seed germination.
Apply 2-3 inches of shredded leaves, straw, or wood chips over beds that won’t be worked until spring. This mulch can be worked into soil later or pushed aside for planting.
Container Garden Soil Preparation
Never use garden soil in containers—it compacts and drains poorly.
For container gardening, purchase quality potting mix or create your own blend:
- 1 part peat moss or coconut coir (moisture retention)
- 1 part compost (nutrients and beneficial microbes)
- 1 part perlite or vermiculite (drainage and aeration)
Prepare or purchase potting mix during winter so containers are ready when planting season arrives.
Flowers to Start in Winter for Summer Color
Certain flowers benefit tremendously from early planning and winter seed starting. Here’s what to focus on for spectacular summer blooms.
Understanding Perennials vs Annuals
Perennial flowers return year after year from the same root system. Examples include coneflowers, black-eyed Susans, bee balm, and hostas. Most perennials are planted in fall or very early spring and often need a full season to establish before blooming heavily.
Annual flowers complete their entire lifecycle in one season—seed to flower to seed again. Examples include zinnias, marigolds, petunias, and cosmos. Annuals provide consistent color all summer but must be replanted each year.
For beginner gardeners, annuals started from seed indoors offer the fastest, most reliable path to abundant summer flowers.
When to Start Seeds Indoors: Simple Timing Guide
Most annual flowers need 6-8 weeks of indoor growth before transplanting outdoors. Calculate your seed starting date by counting backward from your last frost date.
Example: If your last frost date is May 15:
- Count back 6-8 weeks
- Start seeds indoors between March 20 and April 3
Flowers to start 6-8 weeks before last frost:
- Zinnias (fast-growing, heat-loving, excellent for cutting)
- Cosmos (drought-tolerant, attracts pollinators)
- Marigolds (pest-deterrent, easy for beginners)
- Sunflowers (if starting indoors; can also direct sow)
- Sweet alyssum (fragrant edging plant)
Flowers needing 10-12 weeks before last frost:
- Petunias (slow-growing but bloom prolifically)
- Snapdragons (cool-season annual with vertical interest)
- Begonias (shade-tolerant, long-blooming)
- Geraniums (technically tender perennials grown as annuals)
Native Flowers and Cold Stratification
Some native wildflowers and perennials require cold stratification—a period of cold, moist conditions—before germinating.
Seeds like purple coneflower, milkweed, black-eyed Susan, and lupine benefit from “winter sowing.” This technique involves planting seeds in containers outdoors in late winter, allowing natural freeze-thaw cycles to break seed dormancy.
Winter sowing method:
- Use recycled milk jugs or clear containers with drainage holes
- Fill with seed-starting mix and plant seeds at proper depth
- Place outdoors in late January or February
- Seeds experience natural cold treatment and sprout when conditions are right in spring
Best Summer Flowers for Pollinators
As you plan, include flowers that support bees, butterflies, and hummingbirds:
- Zinnias (butterfly magnet, long-blooming)
- Cosmos (attracts beneficial insects)
- Coneflowers (native perennial, excellent for bees)
- Bee balm (hummingbird favorite)
- Salvia (hummingbirds and bees)
- Native wildflowers (region-specific support for local pollinators)
Vegetables to Start Indoors During Winter
Many popular vegetables require long growing seasons or benefit significantly from indoor seed starting. Winter planning determines vegetable garden success.
Tomatoes: The Classic Early-Start Vegetable
Tomatoes are warm-season crops requiring 60-90 days from transplant to harvest, depending on variety. Starting tomato seeds indoors 6-8 weeks before your last frost date ensures plants are ready to transplant when conditions are safe, giving you ripe tomatoes by mid-to-late summer.
Winter planning for tomatoes:
- Research determinate vs indeterminate varieties (bushy vs vining growth)
- Determinate types suit containers and small spaces
- Indeterminate varieties produce more over a longer season but need staking
- Order seeds in January or February for best selection
- Mark your seed starting date on the calendar
Common beginner mistake: Starting tomatoes too early. A tomato seedling started 12 weeks before last frost will be rootbound, stressed, and difficult to transplant successfully.
Peppers Need Even More Time
Both sweet bell peppers and hot peppers grow slowly in their first 6-8 weeks. Start pepper seeds indoors 8-10 weeks before your last frost date.
Peppers need consistent warmth to germinate—around 75-80°F. Use a seedling heat mat or place trays in a warm location like atop a refrigerator until sprouts emerge.
For cold climate gardeners, peppers are particularly challenging. Choose early-maturing varieties bred for short seasons, and focus on providing maximum warmth and sunlight after transplanting.
Cool-Season Vegetables for Early Harvest
While warm-season crops dominate summer gardens, cool-season vegetables provide early harvests and make efficient use of your growing season.
Vegetables that can be started indoors in late winter or direct-sown early:
- Lettuce (fast-growing, can be started indoors 4-6 weeks before last frost)
- Spinach (cold-hardy, direct sow 4-6 weeks before last frost)
- Kale (extremely cold-tolerant, start indoors 6-8 weeks before last frost)
- Peas (direct sow as soon as soil can be worked)
- Broccoli and cauliflower (start indoors 6-8 weeks before last frost for spring harvest)
These crops can often be harvested before summer heat arrives, then replaced with warm-season plantings.
Root Vegetables Require Soil Preparation
Carrots, radishes, beets, and parsnips are typically direct-sown outdoors rather than started indoors. However, winter soil preparation is essential for root crops.
These vegetables need deeply loosened, rock-free soil to develop properly. Compacted or rocky soil causes stunted, forked, or deformed roots.
Use winter to:
- Remove rocks and debris from root crop areas
- Add compost to improve soil structure
- Loosen soil to 8-12 inches deep if possible
- Mark areas designated for root vegetables
Long-Season Crops Need Early Planning
Certain vegetables have particularly long days-to-maturity and require careful timing in cold climates:
- Eggplant (start indoors 8-10 weeks before last frost)
- Brussels sprouts (start indoors 12-14 weeks before last frost for fall harvest)
- Winter squash (start indoors 3-4 weeks before last frost, or direct sow after frost)
- Leeks (start indoors 10-12 weeks before last frost)
For Canadian and Northern US gardeners with short growing seasons, choosing early-maturing varieties of long-season crops is critical. Seed catalogs typically list “days to maturity”—choose varieties with the shortest times that still meet your needs.
Starting Seeds Indoors: Winter Seed Starting Basics
Indoor seed starting might seem complicated, but it’s straightforward once you understand the fundamentals. This is where winter garden planning becomes action.
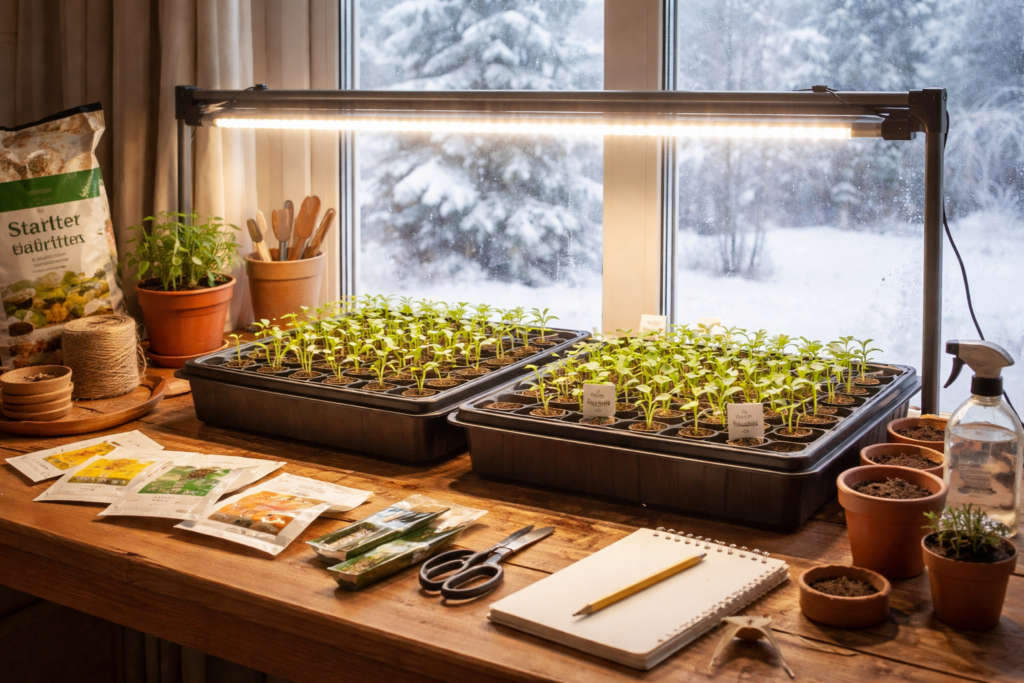
Setting Up a Simple Indoor Seed Starting Station
Essential supplies:
- Seed trays or containers with drainage holes (yogurt cups and egg cartons work)
- Seed starting mix (lighter and less dense than potting soil)
- Plant labels (critical for tracking varieties)
- Grow lights or a very sunny south-facing window
- Watering can with gentle spray or misting bottle
Lighting is the most important factor. Most homes don’t provide adequate natural light in late winter for strong seedling growth. Inexpensive LED grow lights or basic shop lights suspended 2-4 inches above seedlings work extremely well.
Step-by-Step Seed Starting Process
1. Prepare containers and mix: Fill seed trays or containers with moistened seed starting mix. The mix should be damp like a wrung-out sponge, not soggy.
2. Plant seeds at proper depth: General rule: plant seeds 2-3 times as deep as the seed’s diameter. Tiny seeds like petunias are barely covered; larger tomato seeds go about ¼ inch deep.
3. Create humidity: Cover trays with a clear humidity dome or plastic wrap to retain moisture during germination.
4. Provide warmth: Most seeds germinate best at 65-75°F. Bottom heat from a seedling mat accelerates germination but isn’t essential for most crops.
5. Watch for sprouting: Most vegetable and flower seeds germinate in 5-14 days. Check daily and remove humidity dome immediately when sprouts appear.
6. Provide immediate light: The moment seedlings emerge, they need strong light. Position grow lights 2-4 inches above seedlings and run them 14-16 hours daily.
Common Seed Starting Mistakes That Kill Seedlings
Overwatering is the number one killer. Soggy soil causes “damping off”—a fungal disease that kills seedlings overnight. Water only when the soil surface begins to dry. Containers must drain freely.
Insufficient light causes leggy seedlings—stretched, weak stems desperately reaching for light. Leggy seedlings never fully recover. Keep lights close to seedlings and provide 14-16 hours of light daily.
Starting seeds too early results in plants that outgrow their containers before outdoor conditions are safe. Rootbound, stressed seedlings struggle after transplanting.
Starting seeds too late means smaller plants and delayed harvests. Calculate your seed starting dates carefully based on your frost date.
Hardening Off: The Critical Final Step
Plants started indoors have never experienced wind, direct sunlight, or temperature fluctuations. Hardening off gradually acclimates seedlings to outdoor conditions.
7-10 days before transplanting, begin placing seedlings outdoors for a few hours daily:
- Day 1-2: 1-2 hours in shade
- Day 3-4: 3-4 hours in dappled sunlight
- Day 5-6: 4-6 hours with increasing direct sun
- Day 7-10: Full day outdoors, bringing in at night if frost threatens
This process strengthens stems, thickens leaves, and prevents transplant shock.
Winter Garden Planning for Container Gardens
Container gardening suits beginners, renters, and anyone with limited space. Winter preparation ensures container success.
Choosing Containers and Planning Placement
Size matters significantly. Larger containers hold more soil, which means:
- More consistent moisture (less frequent watering)
- More stable temperatures (roots don’t overheat)
- More nutrients (larger soil volume feeds plants longer)
Minimum container sizes:
- Lettuce, herbs, radishes: 6-8 inches deep
- Peppers, bush beans, determinate tomatoes: 12-14 inches deep, 5-gallon capacity
- Indeterminate tomatoes, eggplant: 18-24 inches deep, 10-20 gallon capacity
All containers need drainage holes. Without drainage, roots drown and plants die.
Plan placement during winter by observing sun patterns. Most vegetables and flowering annuals need 6-8 hours of direct sun daily. Track sunlight on decks, patios, or balconies throughout late winter to identify best locations.
Container Soil Is Different From Garden Soil
Never fill containers with garden soil—it compacts, drains poorly, and lacks the aeration roots need in confined spaces.
Use proper potting mix (described earlier) or purchase quality container mix. Plan quantities during winter: a 5-gallon bucket requires about 0.75 cubic feet of potting mix.
Cold Climate Container Considerations
In Canada and Northern climates, containers heat up quickly in summer sun but also cool rapidly in spring and fall.
Choose containers wisely:
- Dark containers absorb more heat (good for warmth-loving plants like tomatoes)
- Light-colored containers stay cooler (better for lettuce and greens)
- Larger containers moderate temperature swings better than small pots
Tools and Supplies to Organize During Winter
Winter is the perfect time to inventory, clean, and organize gardening tools while avoiding the spring rush.
Essential Tools for Beginner Gardeners
Start with these basics:
- Hand trowel: For planting seedlings and small digging tasks
- Bypass pruners: For deadheading flowers and harvesting vegetables
- Garden gloves: Protect hands from thorns, splinters, and soil
- Watering can or hose with adjustable nozzle: Gentle watering is essential for young plants
- Garden fork or rake: For working compost into soil (if you have ground beds)
You don’t need specialized tools initially. As you gain experience, you’ll discover what you actually use versus what sits unused.
Seed Starting Supplies to Gather Now
If starting seeds indoors, assemble these items during winter:
- Seed trays with drainage holes
- Seed starting mix (buy fresh annually—it contains fewer pathogens)
- Plant labels and waterproof markers
- Grow lights with adjustable stands or chains
- Small fan (gentle air circulation prevents fungal diseases)
- Spray bottle or watering can with gentle spout
Many items are cheaper online or during winter sales at garden centers.
Budget-Friendly Alternatives
Gardening doesn’t require significant investment:
- Yogurt cups, egg cartons, or newspaper pots work for seed starting
- Compost can be made free from kitchen scraps and yard waste
- Many communities offer seed swaps or plant exchanges
- Second-hand garden tools often work perfectly after cleaning
Focus your budget on quality seeds and soil amendments—these inputs matter most for garden success.
Common Winter Planning Mistakes Beginner Gardeners Make
Even with excellent intentions, new gardeners make predictable errors during winter planning.
Starting Seeds Too Early
This is the most common and damaging mistake. If you start tomatoes 12 weeks before your last frost instead of 6-8 weeks, you’ll have enormous plants with nowhere to go. They become rootbound, stressed, and perform poorly after transplanting.
Follow seed packet recommendations and calculate timing carefully based on your actual frost date.
Overwatering Indoor Seedlings
Enthusiastic beginners kill seedlings with kindness. Soggy soil promotes fungal diseases that kill seedlings overnight.
Water only when soil surface begins to dry. Soil should feel moist like a wrung-out sponge, never soggy or waterlogged.
Ignoring Soil Quality
No amount of fertilizer compensates for fundamentally poor soil. If you skip soil preparation, plants will struggle regardless of care.
Winter soil improvement is the single highest-impact activity for garden success. Don’t skip this step.
Buying Plants Without a Plan
Come spring, garden centers display gorgeous flowers and vegetables that tempt impulse purchases. Without planning where they’ll go, whether they suit your climate, and if you have space, you’re setting up disappointment.
Create your garden plan during winter, then stick to your shopping list when garden centers open.
Forgetting to Account for Water Access
As you plan garden locations, consider watering logistics. Plants need consistent moisture, especially when establishing.
If your garden is far from water sources, watering becomes a frustrating chore. Plan gardens near hose access or budget for hose length and irrigation supplies during winter.
Winter Garden Planning Resources for Canadian Gardeners
Cold climate gardening presents unique challenges and opportunities. Use winter to research region-specific information.
Finding Frost Dates for Your Location
Canadian frost dates vary dramatically by region. Southern Ontario typically sees last frost in early May, while Northern Ontario may not be frost-free until early June.
Search for: “Ontario frost dates” or your specific province and city. Reliable sources: Agriculture and Agri-Food Canada, provincial agricultural extensions, and local gardening societies.
Choosing Varieties for Short Growing Seasons
When gardening in cold climates with 100-140 frost-free days, variety selection is critical.
Look for these terms in seed catalogs:
- “Short season” or “early maturing”
- Days to maturity under 75 for warm-season crops
- “Cold tolerant” or “suitable for northern gardens”
- Specific recommendations for zones 3-5
Canadian seed companies often breed varieties specifically for shorter growing seasons. Research companies like William Dam Seeds, Vesey’s, and West Coast Seeds that specialize in cold-climate varieties.
Extending the Growing Season
Cold frames, row covers, and season extension techniques help Canadian gardeners maximize limited frost-free days.
Research these methods during winter:
- Low tunnels and row covers (add 2-4 weeks on each end of season)
- Cold frames (protect cool-season crops well into fall)
- Succession planting (plant new lettuce crops every 2-3 weeks)
How Winter Garden Planning Creates a Stress-Free Summer
When you’ve completed thorough winter preparation, summer gardening transforms from overwhelming to genuinely enjoyable.
Reduced Maintenance Means More Enjoyment
Well-prepared soil supports naturally healthier plants. They resist pests and diseases better, need less intervention, and grow more vigorously.
When you start seeds at proper times, plants establish quickly with minimal fussing. You spend less time troubleshooting and more time simply enjoying your garden’s beauty and productivity.
Better Results From Proper Planning
Plants that start strong—with healthy root systems, appropriate timing, and nutrient-rich soil—simply perform better.
They produce:
- More flowers over a longer season
- Larger vegetable harvests
- Better stress tolerance during heat, drought, or pest pressure
- Higher quality produce and blooms
The difference between a properly started plant and one planted on impulse is dramatic. Winter planning creates the foundation for this success.
Building Sustainable Gardening Habits
Success breeds motivation. When your first season goes well because you prepared properly, you’ll be excited to continue.
Gardening becomes a sustainable, rewarding hobby rather than a frustrating experiment abandoned after one disappointing year.
The Long-Term Rewards of Patient Planning
Gardening inherently teaches patience. Tomato seeds started in February don’t produce fruit until July. Compost added in winter shows its benefit months later when plants thrive.
This delayed gratification is profoundly satisfying. You learn to think in seasons and cycles, planning actions today for rewards months away.
Your Winter Garden Planning Action Plan
Now that you understand why winter garden planning matters and what specific actions to take, it’s time to begin.
Start this week:
- Determine your last frost date and first frost date
- Calculate seed starting dates for your priority crops
- Research 3-5 vegetables and 3-5 flowers suited to your climate
- Order seeds from catalogs or online suppliers
- Assess your soil and plan amendments
This month:
- Add compost or mulch to garden beds (if ground isn’t frozen)
- Set up indoor seed starting station with lights
- Clean and organize gardening tools
- Sketch garden layout noting sun exposure and spacing
Next month:
- Begin starting seeds indoors according to your calculated schedule
- Continue researching varieties and techniques
- Source containers and potting mix for container gardens
- Watch for spring weather and prepare for outdoor work
Remember: You don’t need to create an elaborate garden immediately. Start small with a few tomato plants, some easy flowers like zinnias, and perhaps a container of lettuce.
Even a modest, well-planned garden will teach you tremendously and provide genuine satisfaction.
Conclusion: Winter Garden Planning Sets the Foundation for Summer Abundance
Winter might seem like an unlikely season for gardening activity, but it’s actually the most strategic time to prepare for summer success.
By understanding your growing season and frost dates, improving soil while it rests, starting seeds indoors at precisely the right timing, and gathering supplies before the spring rush, you build a solid foundation that supports your garden through the entire growing season.
The quiet work you do this winter—spreading compost on frozen ground, ordering seeds by lamplight, setting up grow lights in a spare corner—will bloom into summer abundance. You’ll step into spring confident, prepared, and genuinely excited to begin planting.
Your future self, standing in a thriving July garden with sun-warmed tomatoes in hand, butterflies dancing among your flowers, and fresh herbs ready for dinner, will be grateful you invested time in winter garden planning.
The best time to prepare your garden for summer is right now, during winter’s quiet months. Start planning today, and watch your efforts transform into a productive, beautiful summer garden that rewards you for months to come.